D-Log M LUTs for DJI cameras
DJI has not published a D-Log M curve, only a D-Log M to Rec. 709 LUT per model.[1][2] So the Found Grade D-Log M pack works in two steps: DJI's LUT first, then one of our 26 looks, built for Rec. 709 input.[3]
USD 29, one time. 26 looks, .cube, 33-point grid.
Pay With USDCOr every camera, the Rec.709 creative set and the setup guides in the Complete Bundle, USD 54.
How the two steps work
Step one: apply DJI's own D-Log M to Rec. 709 LUT for your drone or camera. DJI says that generally only products that support D-Log mode have LUT files, and that for some of those the LUT file is not available.[2][4] Check DJI's page for your model.
Step two: apply a Found Grade look from the pack on top. Do not use a D-Log conversion on D-Log M footage; they are different profiles.[1]
Which DJI cameras record D-Log M
DJI lists it per model. DJI's Mini 4 Pro specification page lists HLG and D-Log M at 10-bit 4:2:0 in H.265.[5]
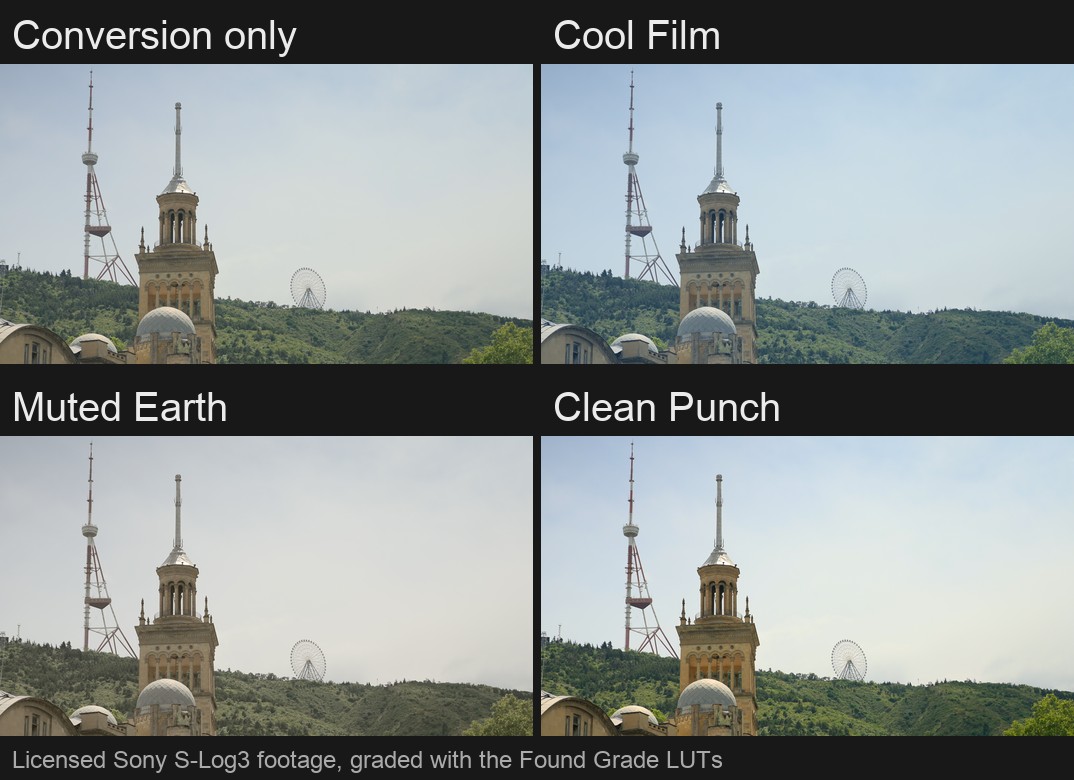
See the looks on real footage
Load the files in your editor
Final Cut Pro
- Select a clip in the browser or timeline.[8]
- In the Info inspector, set the Metadata View menu to General, Extended or Settings.[9]
- Open the Camera LUT menu and choose Add Custom Camera LUT.[10][11]
- Select the Found Grade .cube file for your camera and look.[12][13]
- Set the Output Color Space menu to Rec. 709, then click Open.[14][15]
CapCut desktop
- Open CapCut on your desktop, create a project and import your video.[16]
- Open the Adjustment tab on the left panel and select LUT.[17]
- Click Import and choose the Found Grade .cube file.[18]
- Apply the LUT to your clip.[19]
DaVinci Resolve
- Open Project Settings, then Color Management, then Lookup Tables, and click Open LUT Folder.[20][21]
- Copy the Found Grade .cube files into that folder.[22][23]
- Click Update Lists.[24]
- On the Color page, right-click a node, choose LUT, then 3D LUT, and pick the file.[25]
Premiere Pro
Questions
Why two steps and not one file?
DJI has not published the D-Log M curve, so we do not guess it. DJI's own LUT does the conversion; our look does the grade.[1][3]
Is DJI's LUT included?
No. Download it from DJI for your model.[2]
Which DJI cameras record D-Log M?
DJI lists it per model. The Mini 4 Pro specification page lists HLG and D-Log M at 10-bit.[5]
Sources
- We found no published D-Log M curve or color space from DJI (checked 2026-11-05); DJI's published white papers cover D-Log and D-Gamut. Our own check, 2026-11-05.
- DJI says that generally only products that support D-Log mode have LUT files. Source: What models support D-Log mode? What models have the official LUT files? DJI Support.
- Our D-Log M pack is two steps: DJI's own D-Log M to Rec. 709 LUT for the model, then a Found Grade look built for Rec. 709 input. We do not ship DJI's file. Our own check, 2026-11-05.
- DJI says some products that support D-Log mode have no LUT file. Source: What models support D-Log mode? What models have the official LUT files? DJI Support.
- DJI's Mini 4 Pro specification page lists HLG and D-Log M at 10-bit 4:2:0 in H.265. Source: DJI Mini 4 Pro specifications, DJI (served in Korean).
- Each Found Grade cube is one step: the technical conversion to Rec. 709, then the look. Our own check, 2026-11-05.
- Our S-Log3 cubes were run on five licensed 4K S-Log3 clips from one creator, who states they were shot on Sony A7S III and a6700 cameras. Our own check, 2026-11-05.
- Custom camera LUTs are added from a clip selected in the browser or timeline. Source: Apply LUTs in Final Cut Pro for Mac, Apple Support.
- The Camera LUT menu sits in the Info inspector, under the Metadata View menu set to General, Extended or Settings. Source: Apply LUTs in Final Cut Pro for Mac, Apple Support.
- The Camera LUT pop-up menu has an Add Custom Camera LUT choice. Source: Apply LUTs in Final Cut Pro for Mac, Apple Support.
- When log media is imported, Final Cut Pro detects the log format and applies a built-in camera LUT automatically. Source: Apply LUTs in Final Cut Pro for Mac, Apple Support.
- Final Cut Pro asks you to navigate to the LUT file and select it. Source: Apply LUTs in Final Cut Pro for Mac, Apple Support.
- Final Cut Pro imports 3D LUT files with the .cube and .mga extensions. Source: Apply LUTs in Final Cut Pro for Mac, Apple Support.
- Final Cut Pro asks for the target color space that the custom camera LUT converts to. Source: Apply LUTs in Final Cut Pro for Mac, Apple Support.
- The cubes output Rec. 709 primaries with the inverse BT.1886 transfer (gamma 2.4), SDR. Our own check, 2026-11-05.
- CapCut desktop starts with Create Project, then Import for your video. Source: The Ultimate Guide to LUTs, CapCut.
- CapCut desktop keeps LUTs under the Adjustment tab on the left panel. Source: The Ultimate Guide to LUTs, CapCut.
- CapCut desktop imports custom LUTs as .cube or .3dl files. Source: The Ultimate Guide to LUTs, CapCut.
- CapCut applies the imported LUT to the video. Source: The Ultimate Guide to LUTs, CapCut.
- Resolve keeps its LUT controls in the Color Management panel of the Project Settings. Source: DaVinci Resolve 21 Reference Manual (July 2026), Blackmagic Design, page 3548.
- The Open LUT Folder button opens Resolve's master LUT folder in the file system. Source: DaVinci Resolve 21 Reference Manual (July 2026), Blackmagic Design, page 156.
- Resolve lists LUTs that you have imported into the proper directory for your operating system. Source: DaVinci Resolve 21 Reference Manual (July 2026), Blackmagic Design, page 157.
- Resolve uses 1D and 3D LUTs in the .cube format. Source: DaVinci Resolve 21 Reference Manual (July 2026), Blackmagic Design, page 3546.
- Update Lists refreshes the LUT dropdown menus when you add LUTs while Resolve is open. Source: DaVinci Resolve 21 Reference Manual (July 2026), Blackmagic Design, page 156.
- A LUT is applied from a node's right-click menu, in the LUT submenu, which lists 3D LUT among its choices. Source: DaVinci Resolve 21 Reference Manual (July 2026), Blackmagic Design, page 3551.
- Adobe's steps for an Input LUT start from a clip selected in the Timeline panel. Source: Looks and LUTs, Premiere Pro User Guide, Adobe.
- The Input LUT menu sits in the Basic Correction tab of the Lumetri panel. Source: Looks and LUTs, Premiere Pro User Guide, Adobe.
- The Input LUT dropdown adds a new LUT with Browse. Source: Looks and LUTs, Premiere Pro User Guide, Adobe.
- Premiere Pro then opens a file dialog where you select the LUT file. Source: Looks and LUTs, Premiere Pro User Guide, Adobe.
- Adobe says the LUT is then applied on the clip. Source: Looks and LUTs, Premiere Pro User Guide, Adobe.