iPhone HDR (HLG) LUTs for SDR video
The three iPhone 17 Pro HDR clips we probed were tagged HLG with BT.2020 primaries in 10-bit HEVC.[1] Each Found Grade HLG file converts that signal to Rec. 709 SDR and applies one look in a single step.[2]
USD 29, one time. 26 looks, .cube, 33-point grid.
Pay With USDCOr every camera, the Rec.709 creative set and the setup guides in the Complete Bundle, USD 54.
Turn HDR video on
Apple says to go to Settings, Camera, Record Video and make sure HDR Video is turned on.[3] Apple describes these clips as Dolby Vision HDR videos.[4]
We probed three iPhone 17 Pro clips only. Other iPhone models are unverified.
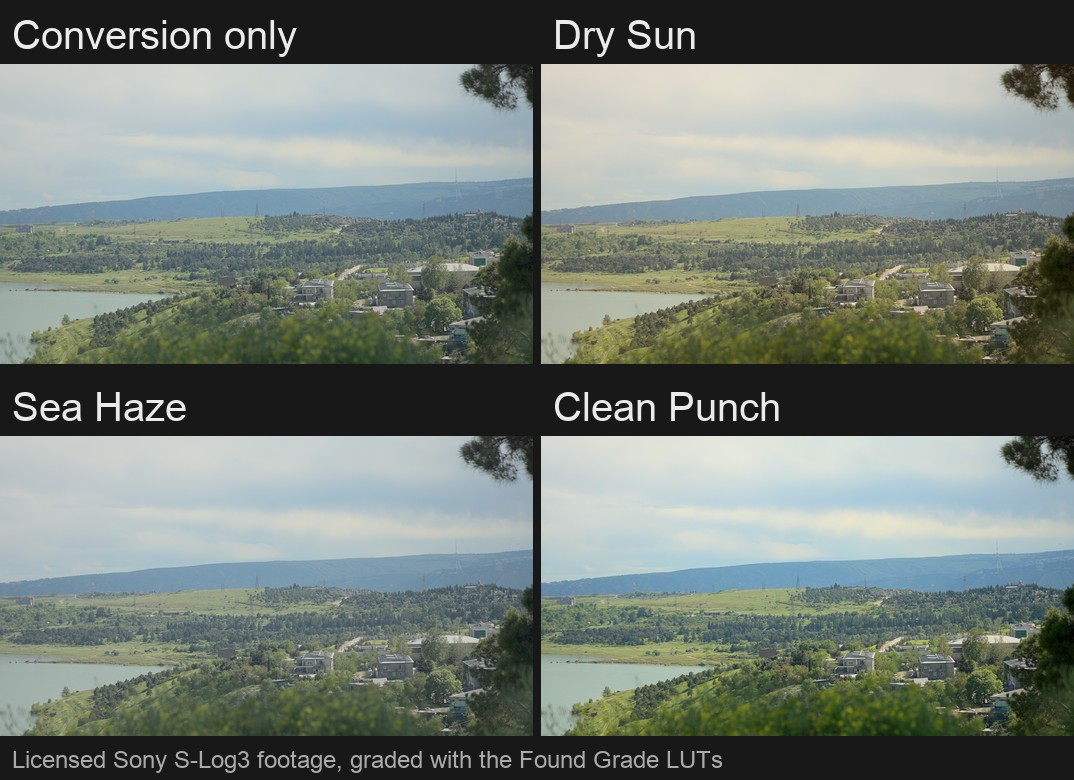
See the looks on real footage
What comes out
The files output SDR Rec. 709.[5] If you deliver HDR, use an HDR grade instead. Apple's own steps for editing these clips use a Wide Gamut HDR Rec. 2020 HLG project in Final Cut Pro.[6]
Load the files in your editor
Final Cut Pro
- Select a clip in the browser or timeline.[10]
- In the Info inspector, set the Metadata View menu to General, Extended or Settings.[11]
- Open the Camera LUT menu and choose Add Custom Camera LUT.[12][13]
- Select the Found Grade .cube file for your camera and look.[14][7]
- Set the Output Color Space menu to Rec. 709, then click Open.[15][5]
CapCut desktop
- Open CapCut on your desktop, create a project and import your video.[16]
- Open the Adjustment tab on the left panel and select LUT.[17]
- Click Import and choose the Found Grade .cube file.[8]
- Apply the LUT to your clip.[18]
DaVinci Resolve
- Open Project Settings, then Color Management, then Lookup Tables, and click Open LUT Folder.[19][20]
- Copy the Found Grade .cube files into that folder.[21][22]
- Click Update Lists.[23]
- On the Color page, right-click a node, choose LUT, then 3D LUT, and pick the file.[24]
Premiere Pro
Questions
Is iPhone HDR video HLG or Dolby Vision?
Apple's page calls these Dolby Vision HDR videos.[4] The three iPhone 17 Pro clips we probed were tagged HLG with BT.2020 primaries.[1] We tested those three clips only.
Will the result be HDR?
No. The files output SDR Rec. 709.[5]
How do I turn HDR video on?
Go to Settings, Camera, Record Video and make sure HDR Video is turned on.[3]
Sources
- Three iPhone 17 Pro HDR clips we probed were tagged arib-std-b67 (HLG) with BT.2020 primaries, 10-bit HEVC. Our own check, 2026-11-05.
- Each Found Grade cube is one step: the technical conversion to Rec. 709, then the look. Our own check, 2026-11-05.
- Apple's setting for iPhone HDR video is Settings, Camera, Record Video, HDR Video. Source: Edit HDR video recorded on an iPhone or iPad, Apple Support.
- Apple describes iPhone HDR video as Dolby Vision HDR video recorded on certain models. Source: Edit HDR video recorded on an iPhone or iPad, Apple Support.
- The cubes output Rec. 709 primaries with the inverse BT.1886 transfer (gamma 2.4), SDR. Our own check, 2026-11-05.
- Apple's Final Cut Pro steps for iPhone HDR video use a Wide Gamut HDR Rec. 2020 HLG project. Source: Edit HDR video recorded on an iPhone or iPad, Apple Support.
- Final Cut Pro imports 3D LUT files with the .cube and .mga extensions. Source: Apply LUTs in Final Cut Pro for Mac, Apple Support.
- CapCut desktop imports custom LUTs as .cube or .3dl files. Source: The Ultimate Guide to LUTs, CapCut.
- Our S-Log3 cubes were run on five licensed 4K S-Log3 clips from one creator, who states they were shot on Sony A7S III and a6700 cameras. Our own check, 2026-11-05.
- Custom camera LUTs are added from a clip selected in the browser or timeline. Source: Apply LUTs in Final Cut Pro for Mac, Apple Support.
- The Camera LUT menu sits in the Info inspector, under the Metadata View menu set to General, Extended or Settings. Source: Apply LUTs in Final Cut Pro for Mac, Apple Support.
- The Camera LUT pop-up menu has an Add Custom Camera LUT choice. Source: Apply LUTs in Final Cut Pro for Mac, Apple Support.
- When log media is imported, Final Cut Pro detects the log format and applies a built-in camera LUT automatically. Source: Apply LUTs in Final Cut Pro for Mac, Apple Support.
- Final Cut Pro asks you to navigate to the LUT file and select it. Source: Apply LUTs in Final Cut Pro for Mac, Apple Support.
- Final Cut Pro asks for the target color space that the custom camera LUT converts to. Source: Apply LUTs in Final Cut Pro for Mac, Apple Support.
- CapCut desktop starts with Create Project, then Import for your video. Source: The Ultimate Guide to LUTs, CapCut.
- CapCut desktop keeps LUTs under the Adjustment tab on the left panel. Source: The Ultimate Guide to LUTs, CapCut.
- CapCut applies the imported LUT to the video. Source: The Ultimate Guide to LUTs, CapCut.
- Resolve keeps its LUT controls in the Color Management panel of the Project Settings. Source: DaVinci Resolve 21 Reference Manual (July 2026), Blackmagic Design, page 3548.
- The Open LUT Folder button opens Resolve's master LUT folder in the file system. Source: DaVinci Resolve 21 Reference Manual (July 2026), Blackmagic Design, page 156.
- Resolve lists LUTs that you have imported into the proper directory for your operating system. Source: DaVinci Resolve 21 Reference Manual (July 2026), Blackmagic Design, page 157.
- Resolve uses 1D and 3D LUTs in the .cube format. Source: DaVinci Resolve 21 Reference Manual (July 2026), Blackmagic Design, page 3546.
- Update Lists refreshes the LUT dropdown menus when you add LUTs while Resolve is open. Source: DaVinci Resolve 21 Reference Manual (July 2026), Blackmagic Design, page 156.
- A LUT is applied from a node's right-click menu, in the LUT submenu, which lists 3D LUT among its choices. Source: DaVinci Resolve 21 Reference Manual (July 2026), Blackmagic Design, page 3551.
- Adobe's steps for an Input LUT start from a clip selected in the Timeline panel. Source: Looks and LUTs, Premiere Pro User Guide, Adobe.
- The Input LUT menu sits in the Basic Correction tab of the Lumetri panel. Source: Looks and LUTs, Premiere Pro User Guide, Adobe.
- The Input LUT dropdown adds a new LUT with Browse. Source: Looks and LUTs, Premiere Pro User Guide, Adobe.
- Premiere Pro then opens a file dialog where you select the LUT file. Source: Looks and LUTs, Premiere Pro User Guide, Adobe.
- Adobe says the LUT is then applied on the clip. Source: Looks and LUTs, Premiere Pro User Guide, Adobe.